
While exploring several ways to improve the surface quality of parts off of 3D printers, Dr. Dennis Cormier, who now works at RIT, suggested that acetone vapors could be used to give parts a glossy finish with just a rice cooker and some acetone. After reading more 3D printing forums and acquiring the necessary material I discovered that this method actually worked! Below is a short video of the process (at 2x speed). This got me thinking. With 3D printing (additive manufacturing) becoming more predominant in the fabrication of functional end-use components, could this method do more?
http://www.youtube-nocookie.com/embed/dmSQqNgljfE?rel=0
What if by using this method we could improve the parts strength and use them in more rigorous applications? How would the fatigue properties improve? Can I quantify the change in surface roughness as an effect of temperature or exposure time? Does the part build orientation matter? While I found many examples of this process on the web, none of these questions have been addressed.
To test this I set up an experiment that included a small electric fryer (with lid), acetone, a 400mL syringe, a thermo couple with two probes, and ABS tensile specimens. For the initial tests I wanted to focus on the influence of surface area on the surface finish as well as the influence of temperature during the bath process. First I designed a plastic tensile specimen with three different scales to investigate if the change in surface area would affect the finish, and then printed 27 parts. One third of the parts were built in the XYZ orientation, one third were built in the XZY orientation and the remaining parts were built in the ZYX orientation. The parts were built on a stratasys dimension SST machine in our lab. I chose to use this machine instead of the BFB machines because I was concerned about the repeatability of the experiments (given the sensitivity of the BFBs, makerbots, etc . to external environmental factors). Below is a photo of the samples:

After I had built the parts I had to design a fixturing system to hang the parts from during the acetone bath to get a uniform finish around the tensile bar. I monitored the temperature with a thermocouple in two locations; one was placed touching the bottom of the pot and the other was suspended very close to the ABS part.
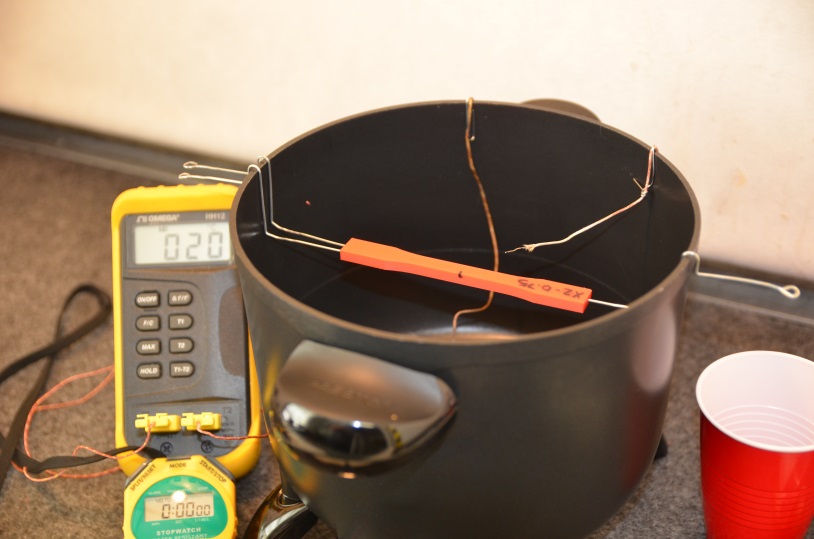
For this preliminary test, I chose a high-temperature case (88) a low-temperature case (74) measured at the top thermocouple. One-third of all samples were left untreated as a control.
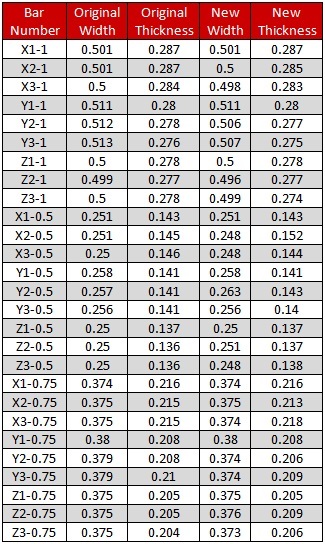
I measured the dimension samples at the center of each tensile specimen before and after treatment. If the dimension is changed by the treatment, this could also influence the tensile test results. Below I’ve included a table showing these data:
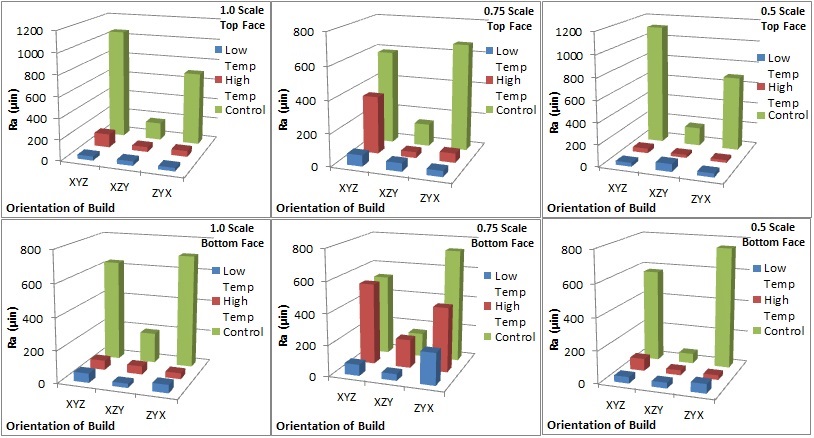
Upon visual inspection, the resulting parts revealed a dramatic difference in the visual appearance between the different tests. To quantify this visual result, I used a Mitutoyo profilometer and measured the surface roughness (Ra). These data are shown in the plots below. I measured the surface roughness to the up-facing surface and the down-facing surface (in the rice steamer) to see if the part orientation in the steamer had an effect on the Ra values.
The next step will be to measure the mechanical properties of the samples. For this , I will be conducting tensile and fatigue testing. I’ll post these results as they are acquired.